Announcing SpacerPacer.com

Introduction

I am immensely proud of and humbled by the work my wife does on a daily basis to help members of the special needs community. As a treating occupational therapist, neurofeedback technician, and a lead of behavior therapy treatment teams, she is in a unique position to apply an exceptionally broad and deep set of tools and methodologies to the problem of helping children with special needs develop to their full potential.

What is Paced Breathing

One of the most useful and accessible tools my wife uses in her practice is paced breathing. Paced breathing is basically the practice of controlling the rate at which one breathes, often with the aid of a device or software program. This is a simple concept, but can have life-altering effects in practice. My wife has shared anecdotes of her patients achieving breakthroughs in their ability to control their temper, attend to class, and manage anxiety as a result of following a paced breathing treatment protocol. While my wife specializes in pediatrics, the technique has broad applications for all age ranges and can also be helpful for physical therapy, focus, and calm.

Requirements / Limitations With Other Apps

Many apps already exist to aid paced breathing. At the time of writing, the Google Play search results for “Paced Breathing” showed over 500 apps in the Google Play store alone. Of course the Apple App Store has a number of paced breathing apps available for download too. Some of these apps cost a small fee to purchase, but a large number of them are free. So why make yet another paced breathing app?

For a paced breathing app to be effective in a clinical setting, it must check a lot of boxes:

  • Therapists need to configure both the pace (i.e. the number of breaths per minute, to a fine level of detail) and the inhale / exhale ratio.
  • Therapists need to prescribe a specific duration for the exercise, either as a fixed amount of time (e.g. 10 minutes) or a set number of breaths (e.g. 20 complete breaths).
  • The app must include a variety of both visual and audio breathing cues for the patient.
  • The app must be simple enough for a patient to use consistently (after receiving some instruction from a therapist).
  • The app must be highly portable; it needs to work on a wide range of devices, including clinic PCs set up as neurofeedback stations, personal phones and laptops used by clinicians, and chromebooks, phones, tablets, or other devices used by the patients themselves, and with minimal network and system dependencies.

The final requirement in particular makes it difficult for a clinic to standardize on any one paced breathing app. A clinic may research different apps and eventually find a great app for iPhones and iPads, but it may not be available for Android, or vice versa. Therapists need just one simple app that they can use at the clinic, then have the patient repeat at home on whatever devices they have available.

Development Process

“How hard could this be?”, I thought. I’ve been writing applications for a long time now and a paced breathing app seemed pretty simple on its face. If anything, the simple graphics required reminded me of the little video games I wrote in high school when I was learning how to program.

What started as a few lines of javascript and some very simple HTML banged together in one night eventually developed into a small but pretty fully featured web application. My wife and I settled into a team dynamic where she would review my latest draft, prioritize a set of changes and features, and work with me to experiment with different audio and visual techniques. She also created the audio used in the application, with some generous help from  our friend Alex / Missing Lynx, who is an incredible music producer, to optimize the audio to sound good on a wide variety of devices.

Summary of Features

After iterating on the paced breathing app and incorporating clinical feedback into updates, fixes, and improvements, the latest version has a number of interesting features:

  • Implemented as a publicly available website that can run on basically any device with a web browser (no app install required).
  • Optimized for performance and download speed on mobile devices and networks.
  • Configurable breaths per minute (down to 0.1 breath resolution)
  • Configurable in/out breath ratio
  • Five different sets of audio options (these are some really cool and unique sounds)
  • Configurable exercise duration, with both common preset values and the ability to specify custom durations
  • Volume setting
  • A standard up and down “beam” visualization, as well as a “candle / flower” visualization (blow out the candle, breathe in the flower)
  • The ability to copy all the settings as a link, in order for a therapist to quickly share a prescribed exercise with a client, or for an end user to save their favorite settings as a bookmark to quickly load later
  • A progress bar
  • A (discrete) button to stop the visualization
  • Ability to reconfigure the settings midway through an exercise
  • Simple, calming and cool graphics with outer space theme (I’m not much of an artist so I had to get a lot of help from my wife on this one)
  • The ability to change any setting during the exercise to adapt to changing preferences and duration change needs

Details like the candle / flower visualization, the unique audio, and the fun graphics were developed and optimized over time based on real world feedback, and really help make this app engaging and accessible even for children with special needs and their families.

How To Use

First, navigate to SpacerPacer.com in your device’s web browser (Safari, Chrome, Firefox or Edge).

You should see a menu where you can configure the paced breathing app settings. The menu has some preset defaults that you can change to suit your needs.

After changing the settings (or not), press the big “Play” button. You should see the settings menu clear and a large bar begin moving up and down. If you have your audio turned on, you should also hear an audible “in breath” and “out breath” sound play in conjunction with the bar.

Breathe in as the bar moves up and down as the bar goes down. Keep breathing in tune with the app until the progress bar at the bottom of the screen is full.

If you need to adjust your settings halfway through, you can click the small gear icon in the top right of the screen and adjust the settings. (Click the gear icon again to dismiss the menu.) You can also click the small square icon in the bottom left of the screen to stop the exercise partway through.

Once you find a set of settings you like, you can click the “link” button in the settings menu to copy a link to SpacerPacer with all of your selected settings pre-applied. The shareable URL is copied directly to your clipboard after clicking the button; you can paste it in an email or text message to share with other people. You can also bookmark the webpage, which will include any settings you have applied.

Technical Details

This project started as a one-page HTML file I wrote on my chromebook text editor during short coding sessions snuck in after dinner. After a while I made some upgrades to my development environment but I kept it as a one-file implementation with no use of any third party libraries or dependencies. As a result the website is very quick to download even on mobile networks, and has decent performance on a wide variety of devices. 

Some of the interesting technical challenges included fading the audio in and out during transitions from in to out breaths (and vice versa), rendering the visualization animation smoothly, and optimizing the audio for size and quality on a wide variety of devices. The code is quite readable and can be viewed using the “View source” command in your web browser. If there is interest I could look into open sourcing some of the specific techniques used or write up a followup blog post on more of the technical details.

Adoption

Since publishing an early version of the app a year or so ago, my wife’s clinic has been using the breathing app regularly for their patients. It has since spread on to some other clinics. I haven’t made an effort to promote the app until now, and I don’t collect any analytics on the app due to privacy concerns, so I honestly don’t know quite how much use the app is getting. If you have any feedback, bug reports, or feature requests, feel free to post in comments – I would love to continue to improve and maintain the app over time.

https://spacerpacer.com

Bicycle Gear Calculator

I am a big fan of Sheldon Brown’s gear calculator page. Sheldon Brown’s gear calculator script allows you to calculate gearing ratios, gear-inches, and speed for given cadences. After using it over the course of several years now, I found myself wanting something that would allow me to adjust the values dynamically and compare multiple different setups at once. I threw together a little app to scratch my itch using Angular.js. Hope this is useful to someone else out there.

Continue reading

How to replace a cracked Chromebook XE303C12 screen for $44

I got a Chromebook a while back. I believe that for at least the mid-term future, the web browser is the de-facto common platform for software, and at $250, the Chromebook is a lightweight, reasonably performant, and affordable price of entry into the rich world of web applications.

Unfortunately I think there were some corners cut in terms of durability to reach the $250 price point. It worked great, fast enough for my needs and very portable, but the screen cracked one day seemingly at random while I was out of the room. There’s not much of a market for Chromebooks with cracked screens, and according to Internet forums the “tech support” is something of a racket designed to fleece customers. I looked into DIY repair options and it turns out the fix is pretty cheap / simple to do at home. It literally took me five minutes.

What you’ll need:

Procedure:

This quick video on Youtube from Dennis Padiernos illustrates the procedure pretty well.

  • Completely power off the computer.
  • Use your fingernail to remove the screen cover, starting from the inside.
    • Save the bottom of the cover for last – this part is held on by a sticky tape. You will have to be persistent and apply steady force. Start from the middle of the bottom and work your way out. The parts are all plastic so don’t use too much force.
  • Remove the screws holding the screen in place. There are only four screws, two on each side of the screen.
  • Lay the screen flat on the keyboard. Locate the cable running from the computer to the screen and disconnect by pulling on the little yellow plastic “handle” on the side closest to you. Be gentle because the metal on the connector is very soft and easy to bend.
  • Place the old screen aside and maneuver the new screen in place, face-down on the keyboard. Align the cable with the screen connector socket, using the yellow plastic handle to maneuver it. It’s hard to see the tiny connector, but the cable side is male and the screen side is female. Pull the two sides together once they are aligned; it should snap it into place.
  • Hold the new screen in place against the computer and reconnect using the four screws. You should be able to turn on the computer now and verify the screen functions.
  • Press the screen cover in place.

That’s it! I wish you and your new screen a long and happy life.

Five JSON REST API Link Formats Compared

In this post I intend to compare five JSON REST API data formats which implement some form of resource linking.

Three Sentence Summary (TLDR)
Web services may benefit from providing links within resource representations, but no clear consensus exists for what these links should contain. By comparing several different formats for embedding links in REST APIs, we can infer some trends which may inform us when designing or consuming REST APIs. If we generalize based on the comparison of five different readily available REST API Link formats, we may conclude that service vendors who provide links are likely to only consistently support target URLs and relation types, while other features such as embedded resource metadata, documentation, and deprecation status are less likely to be supported consistently by vendors.

Continue reading

HTML 5 Placeholder + Autofocus: Cross-browser support for IE

Alternate title: Placeholding is Hard

Recently I implemented a user interface with a search field that used both autofocus and placeholder attributes. I learned that different browsers implement Placeholder attributes differently. The official spec says the placeholder text should disappear on focus, but most modern browsers (Firefox, Chrome, Safari) implement an “unofficial convention”, where the placeholder text remains on focus, until the user begins entering text.

Here’s the catch: IE 10 doesn’t follow that unofficial convention. This is one case where the IE team actually follows the specs better than the other browser vendors do, but the browser still looks like the odd one out since it is the only commonly used browser that implements the feature that way.

Not all developers can agree whether the official spec (clear-on-focus) or the unofficial convention (clear-on-entry) is better, and some people have pretty strong opinions either way. I can see merits to both behaviors, but I don’t take a side either way. The design I had to implement combined both autofocus and a placeholder, however, so I had to override IE 10’s native implementation and backport the behavior to earlier pre-HTML5 versions of IE as well.

It turns out that while there are about a dozen plugins which backport placeholder support to older browsers, none of them did everything I needed them to do:

  • Support for unofficial clear-on-entry behavior
  • Option to override native implementation
  • Support for IE 9
  • DOM compatible with HTML 5 implementation (text as input value, not as absolutely positioned elements)

After evaluating every one of the plugins in Modernizr’s list (linked above), I had to roll up my sleeves and write my own. Nah, that’s too hard, actually I forked Shane Carr’s excellent Placeholdr.js project and modified it just enough to support the unofficial clear-on-entry behavior (Placeholdr originally only supported the official behavior) and to optionally override native implementations.

My forked project is available at https://github.com/SamPlacette/placeholdr if anyone would like to use it. It does itch a unique scratch, so hopefully someone else out there will find it helpful. Eventually I would like to submit a pull request back to the Placeholdr master branch, but first I need to figure out a way to restore backward compatibility with the Placeholdr project.

Hope this helps you out. I’d be curious to hear if you have had to deal with any other unusual problems with cross-browser support or if you have some ideas on what I could do to improve my fork of the Placeholdr project.

Node.js net module server listen socket EPERM error

Today I was playing around with creating a REPL server in Node.js using a local socket (see the Node.js REPLify module if that sounds interesting to you). I got stuck on a permission error when trying to create the REPL server. I eventually tracked it down to within the module, where it executes the “listen” method on a net server with a socket file location param. The weird part was that it failed with the same error even after I opened up the directory permissions to 777, and it even failed when I ran the script as superuser. Another weird behavior was that it worked just fine if I modified the module to listen on a network port instead of on a socket.

That last behavior led me to figure out the problem eventually. Apparently Node.js cannot create sockets on a shared directory in a virtual machine. When I changed the socket to a different directory, it seemed to work just fine with no permission errors.

I wanted to share this information because I couldn’t find it mentioned anywhere on the Internet when I was troubleshooting my problem. Hopefully this helps someone out there.

How to Quantify Software Developer Experience

What’s the hardest question you get asked in a job interview for a software developer position? My beautiful wife can attest that I am self-deprecating to a fault in interviews, but in particular, I tend to get hung up when people ask me to rate myself at a certain skill, e.g., “How good are you at estimation, from 1-10?“. It’s a tough question because anything above 7 implies I think I am some sort of recognized expert, while anything below could be interpreted the other way, as if I had merely read a blog post on the subject and would like to try it some day. The answer is important, because interviewers can use this question to detect resume embellishments and overconfidence, two dangerous traits in a candidate.

I recently had an opportunity to examine the problem of evaluating software developers’ experience, and in my research I found a great answer on StackExchange.com that really resonated with me. I paraphrased and adapted the following categories of software developer experience from the original post by Chuck Conway, which may be referenced at http://programmers.stackexchange.com/a/173107. These categories of experience are also loosely informed by the Programmer Competency Matrix by Sijin Joseph. The following labels are intended to be granular enough to apply to individual skills, tools, languages, etc. in isolation, but may also be applied in aggregate to a developer’s set of primary skills to get an idea of their overall experience.

Without further ado, I submit categories of software developer experience, on a scale of 1 to 10:

Mastery, 7.5 – 10: The developer is an expert in the field, capable of advancing the state of the art and speaking with authority on the subject. The developer possesses deep knowledge of library / language source code and design decisions behind it. The developer may have contributed to the development of the subject and/or may have written on the subject at length.

Proficiency, 5 – 7.5: The developer has multiple projects’ worth of professional experience in the subject and has in-depth first-hand knowledge in design, implementation, and support. The developer knows best practices and understands the motivating factors behind them. The developer is aware of historical, current and future developments in the field. The developer has some knowledge of the underlying implementation details and how it can affect usage. The developer is most likely used to being the most experienced person in their team / organization in this subject, and is comfortable teaching and supervising others in its use and application.

Competency, 2.5 – 5: The developer has experience practicing the subject independently in a professional role. The developer has some awareness of best practices and guiding design principles, and can apply them correctly in most situations. The developer can independently execute support and implementation tasks, but may benefit from some sort of review / supervision process for new design work. The developer is probably most comfortable developing individual components in isolation.

Foundational Ability, 1 – 2.5: The developer has some basic exposure to the subject, either through academic projects or through limited professional work. The developer is not yet skilled at applying the solution to a variety of problems. The developer is not aware of best practices and may contribute to technical debt if not supervised. This developer has the potential to grow and become competent, but needs both oversight and guidance in order to get there.

Skip shopping cart in WooCommerce

My beautiful wife put together a great WordPress blog, and installed the WooCommerce plugin in order to sell some items on her site. However, she didn’t like the conversion flow for end users; users had to add an item to the cart, confirm the quantities and subtotal, then enter payment information. Because my wife only had one SKU (product), and customers could only buy one at a time, she wanted to skip the shopping cart verification step, and allow customers to go straight from the product page to entering payment information after hitting a big red button.

Seems like a reasonable request. However, after much googling, I determined there was no out-of-the-box setting to enable users to skip the cart page after adding an item to the cart. Furthermore, although the WooCommerce plugin app does expose some AJAX endpoints, those endpoints do not provide the ability to reliably add one and only item of a given product to a cart before redirecting a user to the checkout page.

Luckily my beautiful wife is married to an ace programmer. It’s been several years since I’ve done any coding in PHP, but I went ahead and threw down a little modification for the WooCommerce plugin to enable her special use case. I’m releasing the code here into the public domain.

/** * Set cart item quantity action *
 * Only works for simple products (with integer IDs, no colors etc) *
 * @access public
 * @return void */
function woocommerce_set_cart_qty_action() { 
  global $woocommerce;
  foreach ($_REQUEST as $key => $quantity) {
    // only allow integer quantities
    if (! is_numeric($quantity)) continue;

    // attempt to extract product ID from query string key
    $update_directive_bits = preg_split('/^set-cart-qty_/', $key);
    if (count($update_directive_bits) >= 2 and is_numeric($update_directive_bits[1])) {
      $product_id = (int) $update_directive_bits[1]; 
      $cart_id = $woocommerce->cart->generate_cart_id($product_id);
      // See if this product and its options is already in the cart
      $cart_item_key = $woocommerce->cart->find_product_in_cart( $cart_id ); 
      // If cart_item_key is set, the item is already in the cart
      if ( $cart_item_key ) {
        $woocommerce->cart->set_quantity($cart_item_key, $quantity);
      } else {
        // Add the product to the cart 
        $woocommerce->cart->add_to_cart($product_id, $quantity);
      }
    }
  }
}

add_action( 'init', 'woocommerce_set_cart_qty_action' );

Please be aware this code has been tested, but is intended for hobbyist use. No warranty is implied. Your mileage may vary. Offer void where prohibited.

Installation instructions:
Copy and paste the code in your theme’s functions.php file.

Usage instructions:
Create a hyperlink with a query string argument like so:
<url>?set-cart-qty_<product ID>=<quantity>
Where <product ID> is the numerical ID of your product (something like “167”) and <quantity> is the quantity you want set in the user’s shopping cart (most likely this will just be “1”).

Example URL to send user to checkout with exactly one item of product with ID “167” in cart:

http://my.website.com/checkout?set-cart-qty_167=1

In my wife’s case the URL was set to the checkout page, so that she could set up a shiny red button that linked the user to checkout with the appropriate product already set in the cart, ready to check out.

Feel free to use it for your own site; it should be useful for any situation where you want to ensure a single product exists in the cart at a set quantity.

Shoe screws for running in snow, ice, and slush

IMG284

After living in Texas nearly all my life, I am experiencing my first real winter in Boulder, Colorado, and I am woefully underprepared. At the first signs of the coming gales and frigid temps I did the stereotypical Texan thing and bought the biggest, cheapest jacket I could find at Target.

Now that we have really settled into winter here and I have suffered through a few outings in the cold, I have a better appreciation for all the preparations that go into making a fun day outside fun in cold weather. (Hint: It’s not about getting the biggest, cheapest jacket you can find.)

One tricky thing about getting outside and running around in cold weather is snow, ice, and slush. Before I moved to Colorado, my idea of snow came from movies and commercials that featured blanketed white fields or uniformly covered mountains that were feet deep in the stuff. While those conditions do exist, that’s not where the fun is, at least not for me.

I’m a trail runner and I want to get out on the trails, wheeze up steep climbs and bomb the technical descents that I’m used to, albeit through the rosy-white sunglasses of winter. The snow on these trails gets stepped on, rained on, sunshined on, melted, frozen, melted again, refrozen, you get the idea. If it’s been pretty warm there may not be much of any snow on the trail, just the occasional icy patch. You don’t need snow shoes or anything designed for flotation, you just need something to keep you stuck to the ground when the going gets slippy.

I tried some YakTrax (YakTrax XTR to be exact. I assume the XTR stands for “XTReme”, probably a good choice if I decide to street luge down Fern Canyon.) Anyway, they were lousy. They slipped when I tried to apply power going uphill, and they pinched my feet on the downhill. I think they may work better for big stiff hiking boots, but they did not work well for trail running. To be fair, they are work fine for their intended purpose of hiking, but I really like taking descents aggressively and pushing myself on the uphills, and they were just not up to that kind of usage.

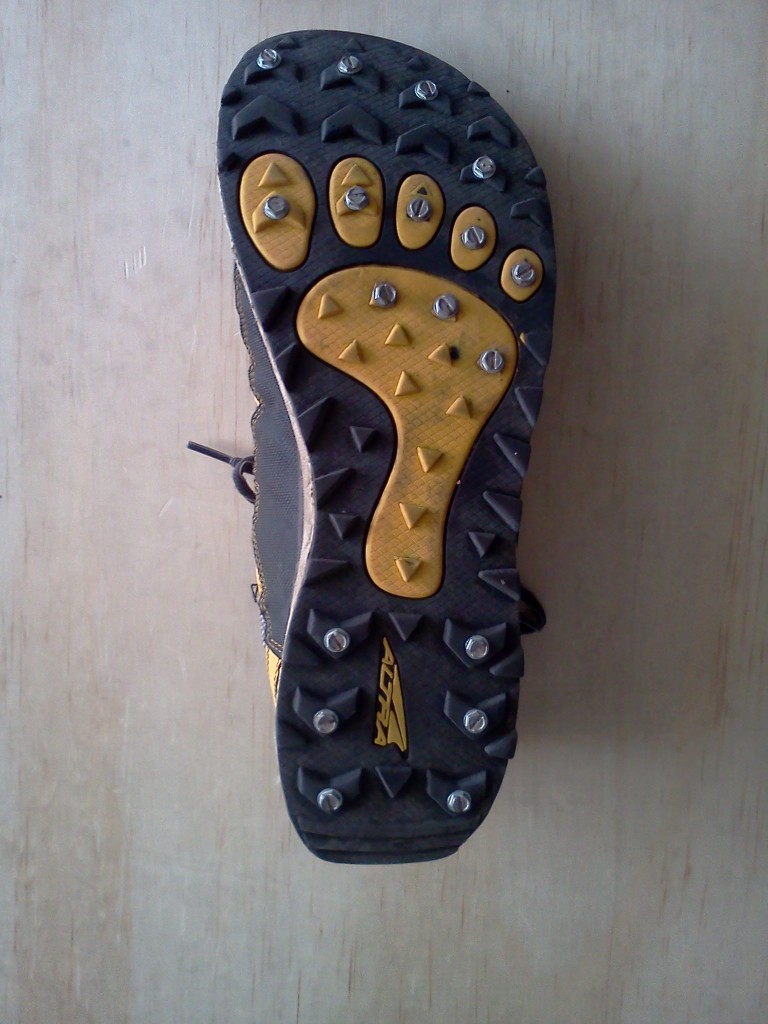
Enter shoe screws. I read and re-read and then forgot most of Matt Carpenter’s article on shoe screws at http://www.skyrunner.com/screwshoe.htm, then finally decided to go for it. My hardware store of choice has a million 40-foot tall rows, but only one half-row dedicated to screws, and they were missing the recommended screw length, so I made the crucial mistake of using 1/2″ screws instead of the 3/8″ screws. Ouch! The 1/2″ screws are fine in the heel area but not so great on the forefoot of thin-soled running shoes.

how to run on snow and ice with studded shoes

Ouch! Not in the middle!

The screws put a hole in my only pair of waterproof socks, and I had to spend a half hour unscrewing the worst of the little suckers on the side of the trail, but eventually I made it to the top of Green Mountain with them, then jogged down. They worked pretty well, except for the part where they stabbed into my feet if I stepped on a rock wrong. Traction was great, no slippage, no pinching, they just worked, and they were hardly noticeable on the pavement.

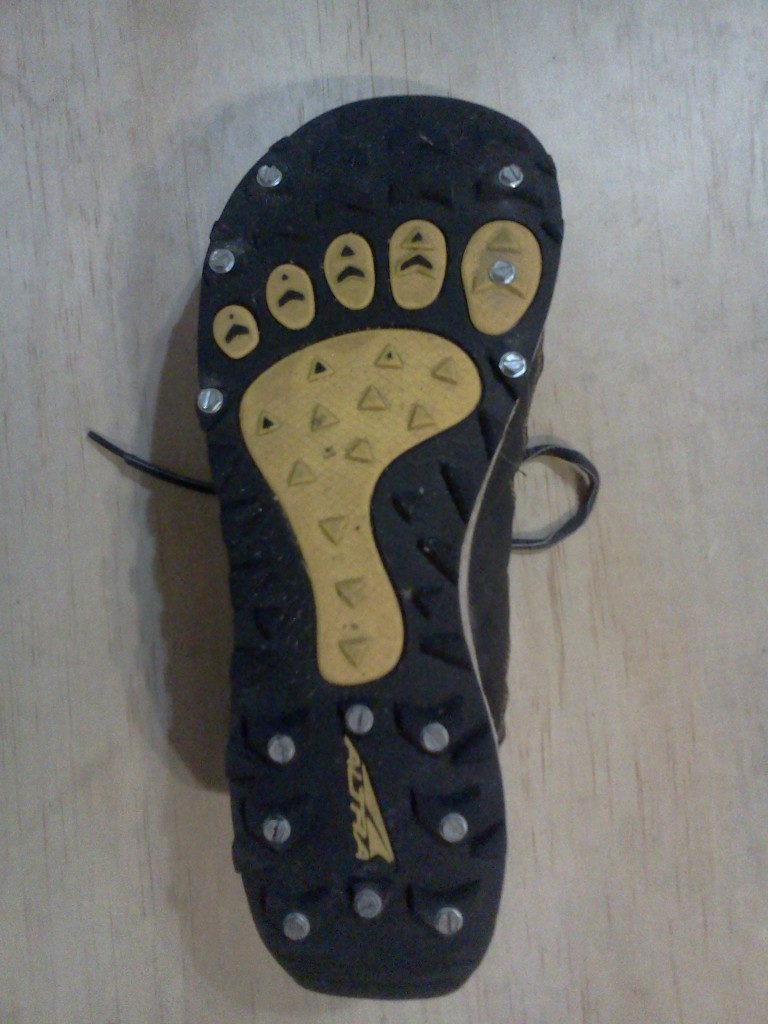
I later mail-ordered the shorter 3/8″ screws and installed them only on the perimeter of the shoe. This definitely helped ease the iron-coffin effect, but I can still feel the screws there on any kind of technical rocky terrain. They are like an anti-rock plate, in that they magnify whatever pointy bits you step on. I would go out on a limb and suggest that for technical trails, shoe screws may work better on thicker, stiffer soles, rather than the lightweight Altra Lone Peaks that I applied them to.

diy studded shoes for running on ice

Ahh, much better. Putting the screws only on the perimeter protects against slipping, and won’t create too much pressure in the middle of your foot.

My screw-studded Lone Peaks may not be ideal for rocky, technical trails, but they work great for snowy, icy non-technical trails and pavement. Since the tread on these shoes was getting worn down anyway, the screws have really given them new life. I have an old pair of heavier Vasque trail running shoes that I’ll try next. These shoes are thicker and stiffer in the sole, so I’m hoping they’ll work a little better on the rocky stuff.

Overall, I’m really enthusiastic about how well the shoe screws worked, and I can’t wait for some more snow so I can try some different variations. Winter is way too beautiful to spend next to a fireplace.


Update Feb 3, 2012:

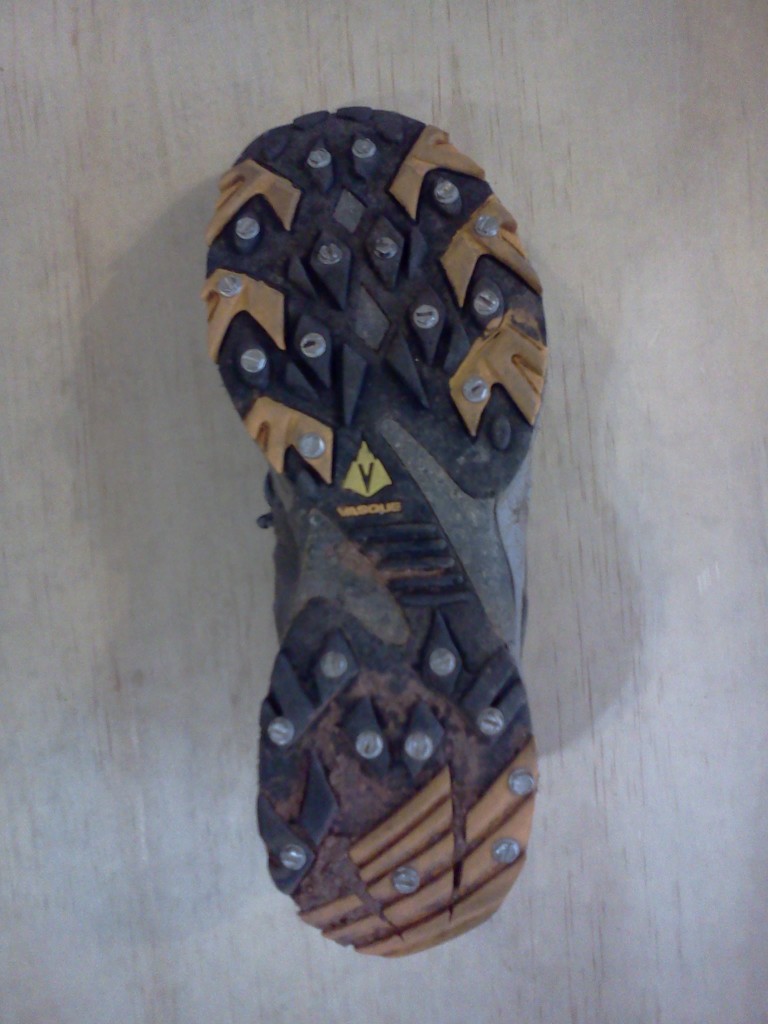
I applied the snow screw treatment to a pretty chunky pair of Vasque trail runners and went for a long hike/jog up Green Mountain, across the west ridge and down Bear Canyon, then up Bear Peak and back down Bear Canyon to home, a challenging figure 8 route I call “Ochotauqua”. Route: MapMyRun Ochotauqua page

I applied a lot more screws to the forefoot this time and I noticed a significant improvement in traction on icy slopes, although I still found myself slipping on the steepest, iciest slopes.

ice screws for running shoes

The stiffer soles did prevent the screws from poking my feet, but the screws seemed to transmit a lot more shock to my feet than I’m used to, and over the course of the 4 hours or so it really added up to a lot of foot fatigue. I was really glad to get home and take them off by the end of the run.

One other thing to note, it seems like the extra screws translated to more noticeable drag on pavement. I think the strategy of putting the screws only on the outside is probably the best compromise.